Quickstart
This quickstart guide will get you using the TRION-SDK and building an example in just a few steps:
TRION Application package installation
Setting a simulated measurement device
Use DEWETRON OXYGEN to learn about the device
Install TRION-SDK and run the quickstart example
Have a look at the example source
Before running the SDK, please install the supported tool-chain (something like Visual Studio):
Visual Studio 2022 or better (for Windows)
cmake
The TRION API exports a C interface. TRION SDK contains examples for different programming languages though main focus will be on C and C++. The presented information will be valid for other languages too.
Install TRION API
The first step is the installation of the DEWETRON TRION Application package.
It is available on DEWETRON Customer Support portal:
https://ccc.dewetron.com/pl/trion-3-modules
After download please run the installer. When using its default settings it will install
TRION API for 32bit and 64bit
DEWETRON TRION Driver
DEWETRON Explorer
DEWETRON DEWE2 Driver
Note
You can omit installation of DEWE2 driver. It is only needed for DEWE2 enclosures and may trigger an unnecessary reboot after installation.
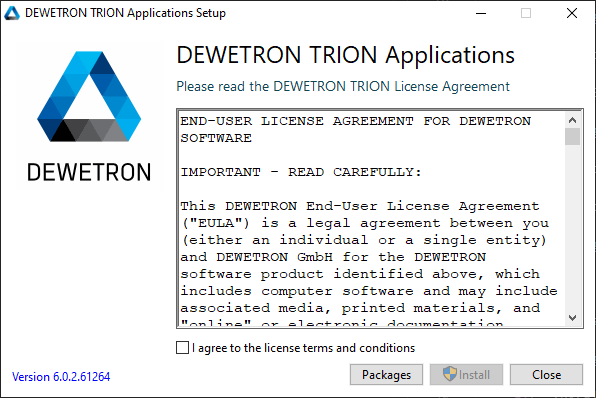
Fig. 10 Starting the TRION installer
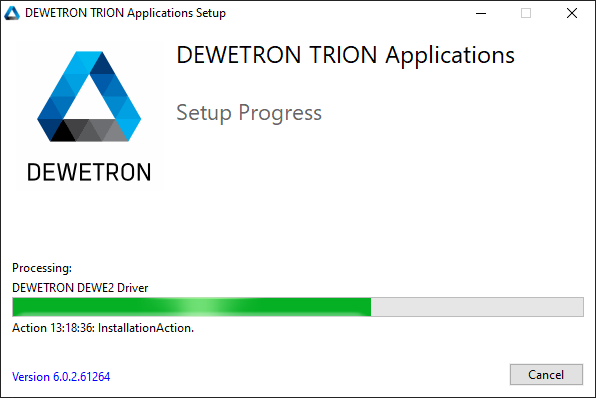
Fig. 11 TRION installation progress
Fig. 12 TRION installation complete
DEWETRON Explorer
If you are lucky and have DEWETRON TRION hardware available you are ready to go. You can start OXYGEN or the quickstart example to test your measurment hardware.
All others have to setup a demo system first. DEWETRON Explorer is the tool for this task.
The app has two different tabs. The Hardware tab displays detected measurement devices. This can be local TRION boards or TRIONet devices found in the network.
The demo tab provides functionality to configure a simulated DEWETRON enclosure and fill its virtual slots with TRION boards.
The next steps guide through the procedure:
Switch to demo tab
Select a DEWE3-A4 enclosure
Double click on TRION3-1850-MULTI-4-D board to put it into the first free slot
Press Save when closing the application.
Warning
You have to close DEWETRON Explorer to have access to the devices with other applications. TRION API and device access is mutual exclusive!
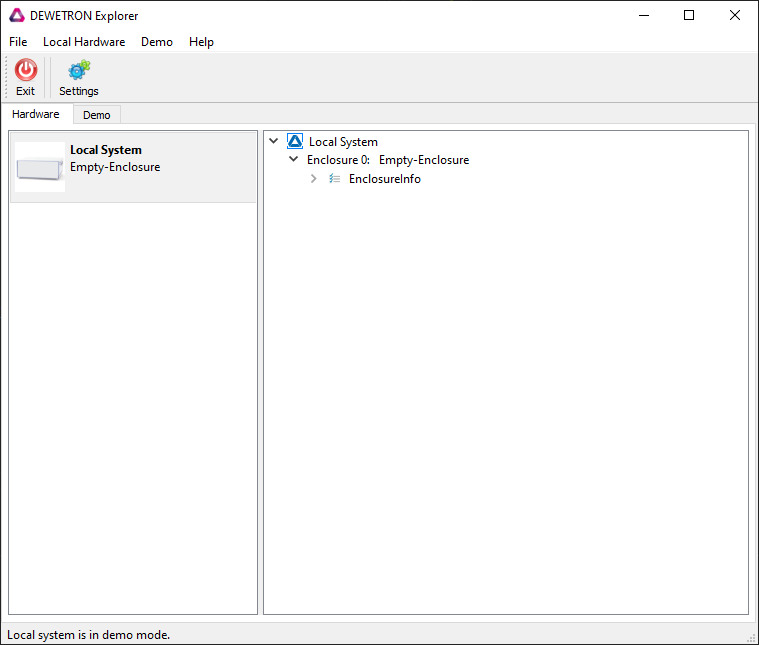
Fig. 13 DEWETRON Explorer hardware window
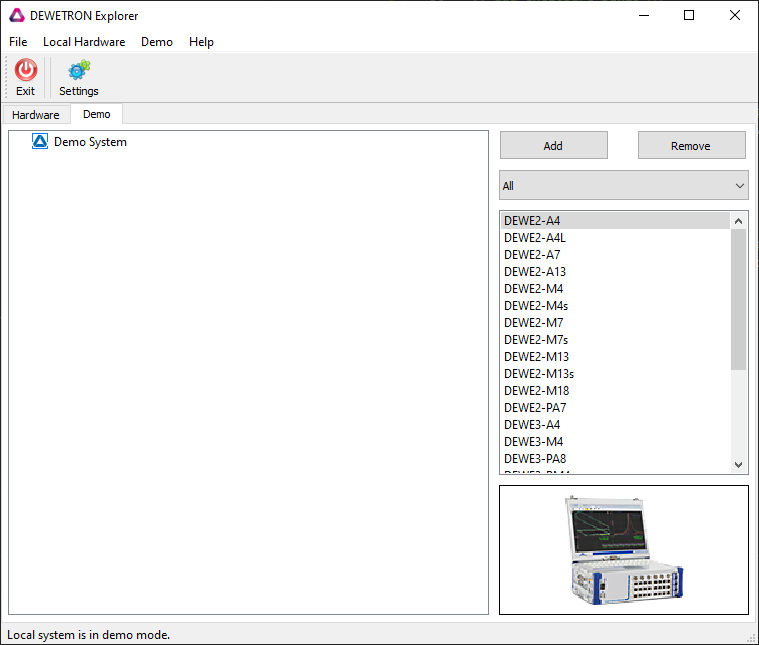
Fig. 14 DEWETRON Explorer demo window
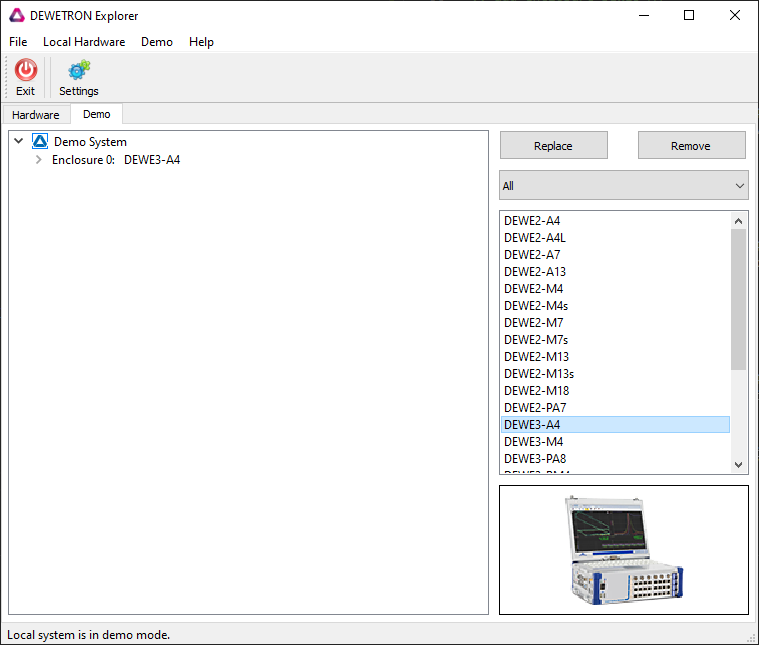
Fig. 15 Select DEWE3-A4 enclosure simulation
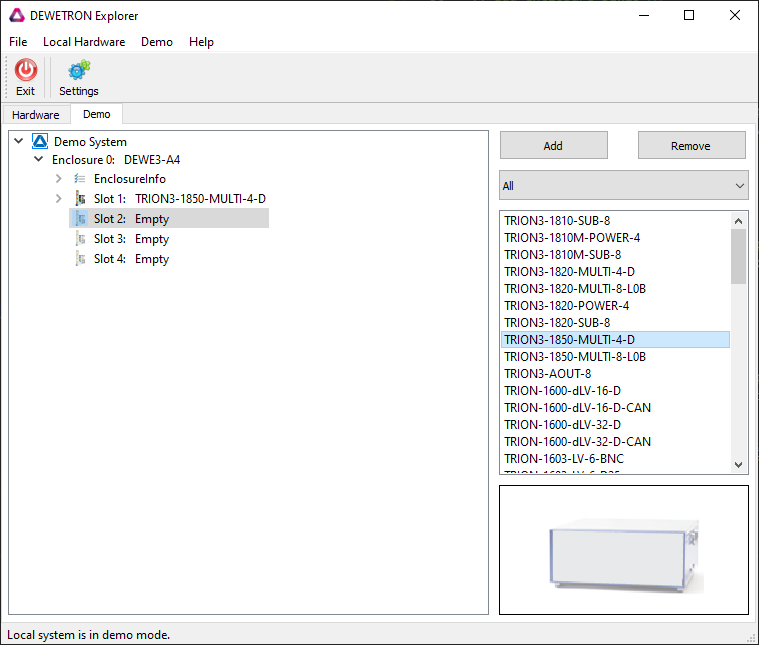
Fig. 16 Select TRION3-1850-MULTI-4-D board
Then quit DEWETRON Explorer and press “Save”. The “demo” system is now available for all applications.
You can use this application to configure a simulation of all possible TRION based systems.
Please note that TRION3 boards can only be put into DEWE3 enclosures. The simulation follows the rule that only PXIe boards may be put into compatible slots. DEWE2 enclosures support PXI only.
DEWETRON Oxygen
The easiest way to verify your demo system is to install and run OXYGEN:
https://www.dewetron.com/products/oxygen-measurement-software/
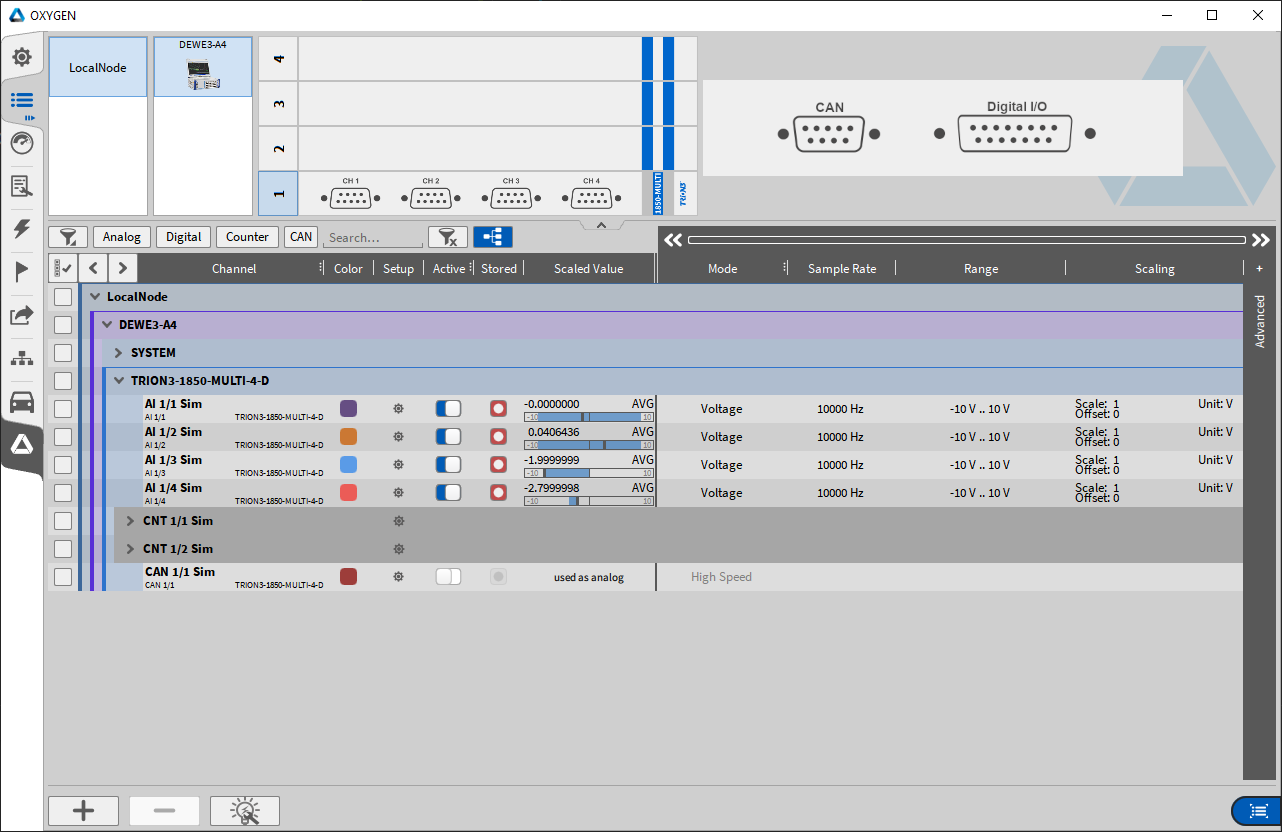
Fig. 17 OXYGEN channel list
Why is there an additional CAN and digital I/O connector shown?
New DEWE3-A4 enclosures feature an internal chassis controller. It provides timing functionality, CAN and basic digital IO.
Get TRION-SDK
Note
For the next steps you need to have a working development environment. Please check if you have Visual Studio 2022 and cmake installed (for Windows).
DEWETRON TRION-SDK is freely available on GitHub. Please clone or download the TRION-SDK repository:
https://github.com/DEWETRON/TRION-SDK
Enter TRION-SDK workspace, then create the quickstart workspace:
$ cd trion\CXX
$ mkdir build
$ cd build
$ cmake ..
-- Selecting Windows SDK version 10.0.18362.0 to target Windows 10.0.19044.
-- Configuring done
-- Generating done
-- Build files have been written to: C:/Development/TRION-SDK/trion/CXX/build
Then double click or open the file TRION_SDK_CXX.sln with Visual Studio.
Quickstart Example
The “Quickstart” example configures and runs a short measurement in just a few steps. It intended to run on the previously configured demo system: a DEWE3-A4 with a TRION3-1850-MULTI-4-D in its first slot. This example is reduced to the base minimum and does not do any error handling or setup optimizations.
Quickstart Example Source Code
 1#include "dewepxi_load.h"
 2#include "dewepxi_apicore.h"
 3#include "dewepxi_apiutil.h"
 4
 5
 6int main(int argc, char* argv[])
 7{
 8    int boards = 0;
 9    int avail_samples = 0;
10
11    // Step 1 : Basic SDK Initialization
12    DeWePxiLoad();
13
14    // boards is negative for simulation
15    DeWeDriverInit(&boards);
16
17    // Step 2: Open boards
18    // 0: chassis controller
19    // 1: TRION3-1850-MULTI
20    DeWeSetParam_i32(0, CMD_OPEN_BOARD, 0);
21    DeWeSetParam_i32(0, CMD_RESET_BOARD, 0);
22    DeWeSetParam_i32(1, CMD_OPEN_BOARD, 0);
23    DeWeSetParam_i32(1, CMD_RESET_BOARD, 0);
24
25    // Step 3: Enable AI0 channel on board 1, disable all other
26    DeWeSetParamStruct_str("BoardID1/AI0", "Used", "True");
27    DeWeSetParamStruct_str("BoardID1/AI1", "Used", "False");
28    DeWeSetParamStruct_str("BoardID1/AI2", "Used", "False");
29    DeWeSetParamStruct_str("BoardID1/AI3", "Used", "False");
30
31    // Step 4: Configure acquisition properties
32    DeWeSetParam_i32(1, CMD_BUFFER_0_BLOCK_SIZE, 200);
33    DeWeSetParam_i32(1, CMD_BUFFER_0_BLOCK_COUNT, 50);
34    DeWeSetParamStruct_str("BoardID1/AcqProp", "SampleRate", "2000");
35
36    // Step 5: Apply settings
37    DeWeSetParam_i32(1, CMD_UPDATE_PARAM_ALL, 0);
38
39    // Step 6: Start acquisition
40    DeWeSetParam_i32(1, CMD_START_ACQUISITION, 0);
41
42    // Step 7: Measurement loop and sample processing
43
44    // This example is only shows howto get the number of samples available
45    // and howto free them:
46
47    // sleep for a short period, then:
48    DeWeGetParam_i32(1, CMD_BUFFER_0_AVAIL_NO_SAMPLE, &avail_samples);
49    DeWeSetParam_i32(1, CMD_BUFFER_0_FREE_NO_SAMPLE, avail_samples);
50
51    // Step 8: Stop acquisition
52    DeWeSetParam_i32(1, CMD_STOP_ACQUISITION, 0);
53
54    // Step 9: Free boards and unload SDK
55    DeWeSetParam_i32(0, CMD_CLOSE_BOARD, 0);
56    DeWeSetParam_i32(1, CMD_CLOSE_BOARD, 0);
57    DeWeDriverDeInit();
58    DeWePxiUnload();
59    return 0;
60}
Note
Running the example is possible, but it generates no output. Its only purpose is to explain the setup.
Walk through the Source Code
Step 1:
DeWePxiLoad();
DeWeDriverInit(&boards);
DeWePxiLoad loads the libray. It calls dlopen and maps all exported C functions, but does not do any initialization.
DeWeDriverInit initializes API internals. It stores the number of detected devices in the boards variable. if the value stored in boards is negative, the API indicates that a simulation environment or demo system is active. Positive values mean that real hardware is active.
Note
Hardware access is exclusive. Only one process is allowed to access devices. Do not run Oxygen or Dewetron EXPLORER at the same time as your example.
Step 2:
DeWeSetParam_i32(0, CMD_OPEN_BOARD, 0);
DeWeSetParam_i32(0, CMD_RESET_BOARD, 0);
DeWeSetParam_i32(1, CMD_OPEN_BOARD, 0);
DeWeSetParam_i32(1, CMD_RESET_BOARD, 0);
In step 2 the individual boards have to be openend and reset to a valid default state. This is done using the DeWeSetParam_i32 function. The first argument a index number referencing a dedicated board. With the current demo system the board with index 0 is the internal chassis controller. Index 1 references the TRION3-1850-MULTI-4-D board.
After CMD_RESET_BOARD the devices are ready for the next configuration steps.
Step 3:
DeWeSetParamStruct_str("BoardID1/AI0", "Used", "True");
In this step the first analog channel “AI0” is enabled. The other available analog channels are disabled. For this the api function DeWeSetParamStruct_str is used. The first argument is the target string referencing the first AI channel of the board with index 1. The second argument selects the used property, which is set to “True” by the third argument.
“False” is the second allowed value and it is applied to the other AI channels to disable them.
Step 4:
DeWeSetParam_i32(1, CMD_BUFFER_0_BLOCK_SIZE, 200);
DeWeSetParam_i32(1, CMD_BUFFER_0_BLOCK_COUNT, 50);
DeWeSetParamStruct_str("BoardID1/AcqProp", "SampleRate", "2000");
Now the acquisition properties have to be configured. CMD_BUFFER_0_BLOCK_SIZE and CMD_BUFFER_0_BLOCK_COUNT are used to setup the acuisition buffer for the AI channel.
The sample rate has to be configured by setting the SampleRate property of the BoardID1/AcqProp property.
Step 5:
DeWeSetParam_i32(1, CMD_UPDATE_PARAM_ALL, 0);
Up to this point channel and acquisition configuration was done. But it did not apply to the hardware device. The devices are still on the default settings made by using CMD_RESET_BOARD. The new configuration is applied to the hardware by using CMD_UPDATE_PARAM_ALL.
Step 6:
DeWeSetParam_i32(1, CMD_START_ACQUISITION, 0);
Now it is time to start the aquisition. This is done by the command CMD_START_ACQUISITION.
Usually this is done before entering a acqisition loop processing the measured samples.
Step 7:
DeWeGetParam_i32(1, CMD_BUFFER_0_AVAIL_NO_SAMPLE, &avail_samples);
DeWeGetParam_i32(1, CMD_BUFFER_0_FREE_NO_SAMPLE, &avail_samples);
Just read the number of samples stored in the buffer since CMD_START_ACQUISITION. After processing the samples, the application has to free them with CMD_BUFFER_0_FREE_NO_SAMPLE to free buffer memory for new samples.
Note
Please note that the acquisition loop is missing in this example. It will be shown in following examples.
Step 8:
DeWeSetParam_i32(1, CMD_STOP_ACQUISITION, 0);
CMD_STOP_ACQUISITION is used to end acquisition and therefore the measurement. No new samples will be stored in the buffer.
Step 9:
DeWeSetParam_i32(0, CMD_CLOSE_BOARD, 0);
DeWeSetParam_i32(1, CMD_CLOSE_BOARD, 0);
DeWeDriverDeInit();
DeWePxiUnload();
Close the access to measurement devices. DeWeDriverDeInit uninitializes reserved API memory and structures. Then DeWePxiUnload unloads the library.
Lessions Learned!
Congratulations! With the help of this chapter you installed a working toolchain. Using DEWETRON explorer you configured a demo system. You validated the system using DEWETRON OXYGEN where you had a look at the different channels your measurement board provided.
You generated a solution for Visual Studio and compiled the Quickstart example. You read about the highlighted steps of the example.
You even run the example! The example accessed measurement devices, configured a short acquisition and exited.
The next steps wil extend on that.
Next Step: Acquisition Loop
Have a look at the next example: QuickstartAcq.cpp
This example improves on the first one by implementing a simple acquisition loop.
Quickstart with simple Acquisition
  1#include "dewepxi_load.h"
  2#include "dewepxi_apicore.h"
  3#include "dewepxi_apiutil.h"
  4#include <iostream>
  5
  6int main(int argc, char* argv[])
  7{
  8    int boards = 0;
  9    int avail_samples = 0;
 10    int64_t buf_end_pos = 0;        // Last position in the ring buffer
 11    int buff_size = 0;              // Total size of the ring buffer
 12
 13    // Basic SDK Initialization
 14    DeWePxiLoad();
 15
 16    // boards is negative for simulation
 17    DeWeDriverInit(&boards);
 18
 19    // Open boards
 20    // 0: chassis controller
 21    // 1: TRION3-1850-MULTI
 22    DeWeSetParam_i32(0, CMD_OPEN_BOARD, 0);
 23    DeWeSetParam_i32(0, CMD_RESET_BOARD, 0);
 24    DeWeSetParam_i32(1, CMD_OPEN_BOARD, 0);
 25    DeWeSetParam_i32(1, CMD_RESET_BOARD, 0);
 26
 27    // Enable AI0 channel on board 1, disable all other
 28    DeWeSetParamStruct_str("BoardID1/AI0", "Used", "True");
 29    DeWeSetParamStruct_str("BoardID1/AI1", "Used", "False");
 30    DeWeSetParamStruct_str("BoardID1/AI2", "Used", "False");
 31    DeWeSetParamStruct_str("BoardID1/AI3", "Used", "False");
 32
 33    // Configure acquisition properties
 34    DeWeSetParam_i32(1, CMD_BUFFER_0_BLOCK_SIZE, 20);
 35    DeWeSetParam_i32(1, CMD_BUFFER_0_BLOCK_COUNT, 50);
 36    DeWeSetParamStruct_str("BoardID1/AcqProp", "SampleRate", "100");
 37
 38    // Apply settings
 39    DeWeSetParam_i32(1, CMD_UPDATE_PARAM_ALL, 0);
 40
 41    // Get buffer configuration
 42    DeWeGetParam_i64(1, CMD_BUFFER_0_END_POINTER, &buf_end_pos);
 43    DeWeGetParam_i32(1, CMD_BUFFER_0_TOTAL_MEM_SIZE, &buff_size);
 44
 45    // Start acquisition
 46    DeWeSetParam_i32(1, CMD_START_ACQUISITION, 0);
 47
 48    // Measurement loop and sample processing
 49    int64_t read_pos = 0;
 50    int32_t* read_pos_ptr = 0;
 51    int sample_value = 0;
 52
 53    // Break with CTRL+C only
 54    while (1)
 55    {
 56        // Get the number of samples available
 57        DeWeGetParam_i32(1, CMD_BUFFER_0_AVAIL_NO_SAMPLE, &avail_samples);
 58        if (avail_samples <= 0)
 59        {
 60            Sleep(100);
 61            continue;
 62        }
 63
 64        // Get the current read pointer
 65        DeWeGetParam_i64(1, CMD_BUFFER_0_ACT_SAMPLE_POS, &read_pos);
 66
 67        // Read the current samples from the ring buffer
 68        for (int i = 0; i < avail_samples; ++i)
 69        {
 70            // Handle the ring buffer wrap around
 71            if (read_pos >= buf_end_pos)
 72            {
 73                read_pos -= buff_size;
 74            }
 75
 76            // read_pos a variable containing the address of the first sample
 77            // of the new block.
 78            // It is necessary to cast it to a pointer (reinterpret_cast in C++)
 79            // nd to add i to process all samples.
 80            read_pos_ptr = reinterpret_cast<sint32*>(read_pos) + i;
 81            sample_value = *read_pos_ptr;
 82
 83            // Warning: This will not work for multiple AI channels with
 84            // 24Bit resolution
 85            // Please have a look at the acq with scan_descriptor example.
 86
 87            std::cout << "AI0: " << std::dec << sample_value
 88                      << "     " << std::hex << sample_value << std::endl;
 89        }
 90
 91        DeWeSetParam_i32(1, CMD_BUFFER_0_FREE_NO_SAMPLE, avail_samples);
 92    }
 93
 94
 95    // Stop acquisition
 96    DeWeSetParam_i32(1, CMD_STOP_ACQUISITION, 0);
 97
 98    // Free boards and unload SDK
 99    DeWeSetParam_i32(0, CMD_CLOSE_BOARD, 0);
100    DeWeSetParam_i32(1, CMD_CLOSE_BOARD, 0);
101    DeWeDriverDeInit();
102    DeWePxiUnload();
103
104    return 0;
105}
Walk through the QuickstartAcq Source Code
After CMD_UPDATE_PARAM_ALL was used to apply the settings made, the necessary sample buffer parameters have to be requested.
DeWeGetParam_i64(1, CMD_BUFFER_0_END_POINTER, &buf_end_pos);
DeWeGetParam_i32(1, CMD_BUFFER_0_TOTAL_MEM_SIZE, &buff_size);
Also supported is CMD_BUFFER_0_END_POINTER to retrieve a pointer to the buffer start. But it is not necessary to implement the buffer wrap around handling and therefore not used.
Note
The samples are stored in a ring buffer. When iterating the buffer you have to look for the buffer end and implement the wrap around handling.
DeWeGetParam_i32(1, CMD_BUFFER_0_AVAIL_NO_SAMPLE, &avail_samples);
Just read the number of samples stored in the buffer since CMD_START_ACQUISITION. if avail_samples is zero you can continue with the next loop iteration. A call to Sleep is optional.
DeWeGetParam_i64(1, CMD_BUFFER_0_ACT_SAMPLE_POS, &read_pos);
With CMD_BUFFER_0_ACT_SAMPLE_POS we get the address of the oldest unprocessed sample.
for (int i = 0; i < avail_samples; ++i)
{
    // Handle the ring buffer wrap around
    if (read_pos >= buf_end_pos)
    {
        read_pos -= buff_size;
    }

    read_pos_ptr = reinterpret_cast<sint32*>(read_pos) + i;
    sample_value = *read_pos_ptr;

    std::cout << "AI0: " << std::dec << sample_value << "   " << std::hex << sample_value << std::endl;
}
This loop iterates all the samples. read_pos has to be cast to a pointer to able to read from the sample position. i is added to the pointer to reach and read all samples.
read_pos has to be compared to buf_end_pos. If this boundary is reached buff_size has to be subtracted to return to the start of the buffer.
DeWeSetParam_i32(1, CMD_BUFFER_FREE_NO_SAMPLE, avail_samples);
After the inner loop completed, free the ring buffer with CMD_BUFFER_FREE_NO_SAMPLE. If you do not free the ring buffer it will get full and the acquisition will stop with a buffer overflow error.
Everthing else is identically to the first quickstart example.
Achievements after Quickstart with Acquisition
Using QuickstartAcq we implement our first measurement application using one volatge channel.
Now we got an output like this:
$ ./quickstart/Debug/QuickstartAcq.exe
AI0: 0   0
AI0: 421379   66e03
AI0: 841096   cd588
AI0: 1257494   133016
AI0: 1668929   197741
AI0: 2073777   1fa4b1
AI0: 2470441   25b229
AI0: 2857356   2b998c
A list of the raw sample values. One column in decimal, the other in hexadecimal.
What is still missing?
The example accessed the samples using CMD_BUFFER_0_ACT_SAMPLE_POS and pointer arithmetic. The algorithm for access the samples is board dependent. Please not that 24bit samples of a TRION-2402-dACC are packed a differentway in comparison to a TRION3-1850-MULTI. So a readout function for one board may not work for another type.
There is a solution for that: The next example QuickstartAcqScanDesc introduces a new concept, the scan descriptor. Its a set of rules telling you how the samples are organized in the sample ringbuffer. If an application implements and follows the rules, it is able to access the sample buffer in generic way that is guaranteed to work for all TRION and TRION3 boards.
An example explaining the scan descripter is QuickstartAcqScanDesc.
QuickstartAcqScanDescScaled further extends the example showing a way how range scaling can be implemented.
The scan descriptor concept itself is explaind in chapter Data Acquisition Scan Descriptor